A practical attempt to understand the powerful Text To Speech of Android.
Introduction
Right now all the android phones have the ability to speak out the texts of a screen via a generated voice. How does Android convert the texts into the speech then? Android Text To Speech is the answer. It is one of the powerful Android features that can allow users to convert plain text into speech that is synthesized by the Android TTS engine. It has a variety of usages, and its main purpose is to give users the ability to hear the texts spoken out loud in their android phones without the need to look at them. It enables users to do other things while listening to the contents of an app. It also helps illiterate users or users with disability to understand the texts in an app without difficulty.
Text To Speech was initially introduced in Android 1.6 API 4 in 2009, and it gradually becomes mature as the Android programmers invest their times in improving the feature. Right now, all Android platforms that has an API level bigger than API 4 can support the TTS feature. In order to really understand the Android Text To Speech feature, we need to first explore a few aspects of Android TTS engine that is important to the TTS-enabled application, and then understand how to incorporate the TTS feature into our application and configure the TTS engine correctly to make our application speak by showing a TTS-enabled example app.
A workflow diagram like below is also helpful for understanding how to incorporate the TTS feature into an app:
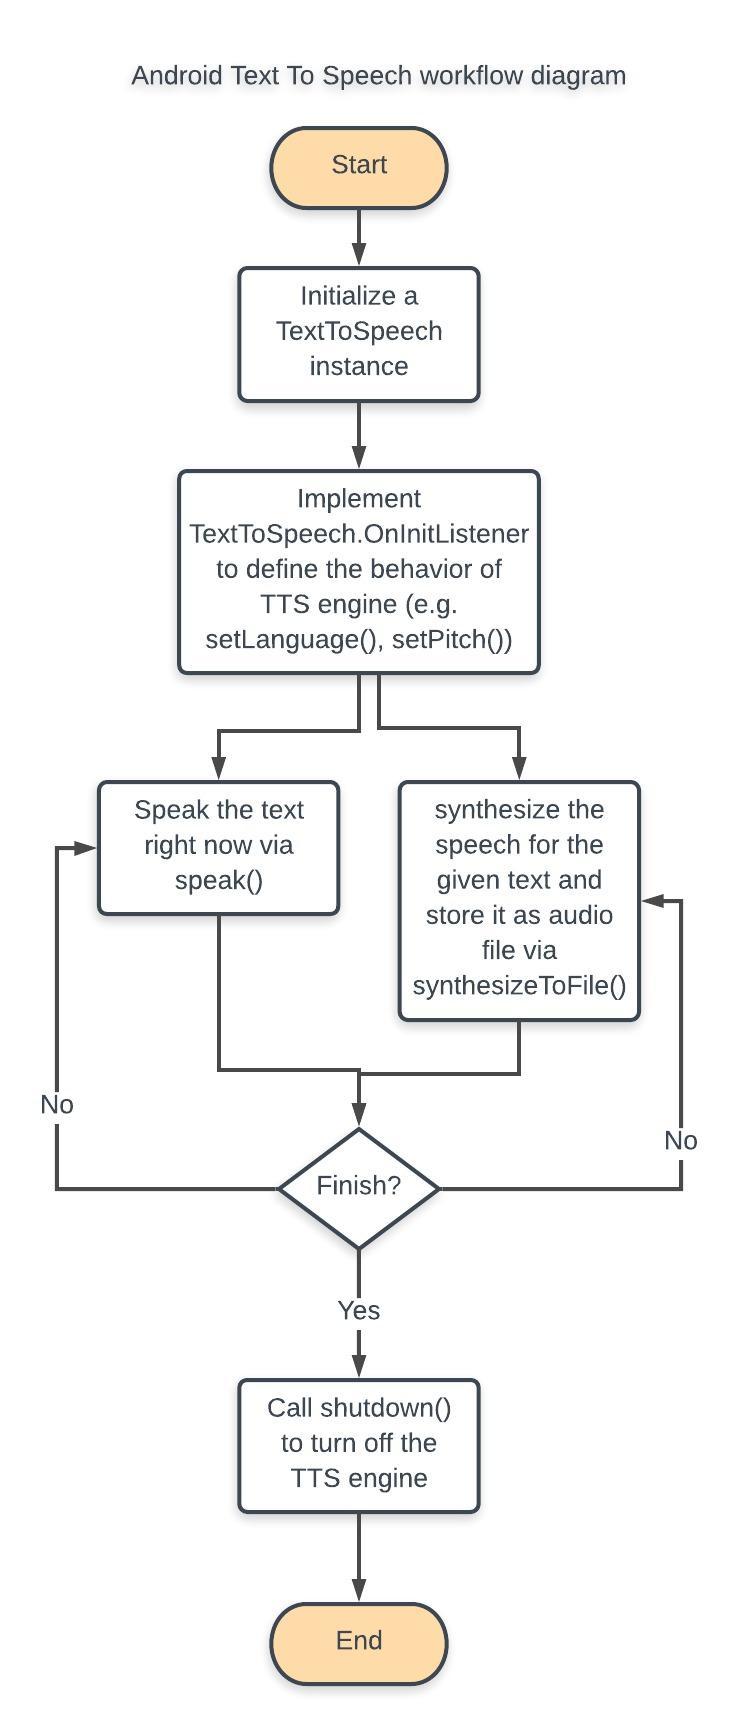
I will explain all parts of the TTS workflow diagram section by section from Start to End and also implement the example app according to this workflow diagram.
TTS Engine
The TTS engine is an android framework that provides the android app the ability to perform speech synthesis that converts the texts inside the app into a spoken voice output. It is included in the Android platform, and it supports a large number of languages such as Chinese, English, French, Italian, Japanese, Russian, and Spanish, etc.. It also supports a variety of dialects from the same language (e.g. British English, American English, Canadian French, etc.) because the same language can be spoken differently in different regions of the world.
In order to make the TTS engine work correctly in an app, we have to first initialize a TextToSpeech instance in that app’s activity via its constructor that takes the application’s context and TextToSpeech.OnInitListener. The TextToSpeech.OnInitListener must be configured because we need to define the behaviors of the TextToSpeech engine so that it can correctly speak the texts according to our needs. Here is an example for what an initialization of TextToSpeech instance in a MainActivity looks like:
public class MainActivity extends AppCompatActivity {
   TextToSpeech mTextToSpeech;

   @Override
   protected void onCreate(Bundle savedInstanceState) {
       super.onCreate(savedInstanceState);
       setContentView(R.layout.activity_main);
       // initialization of TextToSpeech Instance
       mTextToSpeech = new TextToSpeech(getApplicationContext(), new TextToSpeech.OnInitListener() {
           @Override
           public void onInit(int status) {
               // if initialization is successful, define the behaviors of the TextToSpeech engine
               if (status == TextToSpeech.SUCCESS) {
                   // set the language to be American English
                   Locale language = Locale.US;
                   int isSupported = mTextToSpeech.setLanguage(language);
                   if (isSupported != TextToSpeech.LANG_AVAILABLE && isSupported != TextToSpeech.LANG_COUNTRY_AVAILABLE) {
                       Toast.makeText(getApplicationContext(),"The current language " + language.toString()+ " is not available.",
                               Toast.LENGTH_SHORT).show();
                   } else {
                       // it is supported
                       int statusForPitch = mTextToSpeech.setPitch(2); // set the pitch to be normal
                       int statusForRate = mTextToSpeech.setSpeechRate(2); // set the speech rate to 2
                       if (statusForPitch != TextToSpeech.SUCCESS) {
                           Toast.makeText(getApplicationContext(), "Fail to set pitch", Toast.LENGTH_SHORT).show();
                       }
                       if (statusForRate != TextToSpeech.SUCCESS) {
                           Toast.makeText(getApplicationContext(), "Fail to set the Speech rate", Toast.LENGTH_SHORT).show();
                       }
                   }
               }
           }
       });
   }
}
In the above example, we first check the status of the initialization of the TextToSpeech instance. If it is successful, we move on to define the behaviors of this instance. We first set the language via mTextToSpeech.setLanguage(language) to load and set language, in the country US, to our TextToSpeech engine. That method takes Locale object (i.e. Locale.US) as a parameter and return an integer (e.g. TextToSpeech.LANG_AVAILABLE, LANG_COUNTRY_AVAILABLE, and LANG_NOT_SUPPORTED, etc.) to indicate the status of the chosen Locale. We can also set the pitch of the speech for the engine via mTextToSpeech.setPitch(2) and its speech rate via mTextToSpeech.setSpeechRate(2), which both take a float as input and return either TextToSpeech.SUCCESS or ERROR for status checking. The setPitch method’s default pitch value is 1, which is normal pitch. The higher value of the input increases the pitch, whereas the low value lowers it. The setSpeechRate method works like the setPitch method except that it sets the speech rate. These two methods essentially allow us to determine the synthesized speech’s tone and speed.
Alternatively, we can choose which TTS engine to be used in the app by call TextToSpeech.setEngineByPacakgeName(String enginePackageName). If the given engine exists, the TextToSpeech instance will use that engine. Otherwise, by default it uses the default TTS engine provided by the phone device.
Language and Locale
Note that in the above example code for MainActivity class, we mention about the Locale object that is the input parameter of the TextToSpeech.setLanguage() method. This Locale object is provided by android operating system, and it essentially tells the TextToSpeech engine which language to load. If we look into the Locale object, we can see that it supports various accents of the same languages (e.g. Canada French, France French, etc.). We can use Locale.getAvailableLocales() to get the variety of the same language in different regions of the world (e.g. new Locale(“en”).getAvailableLocales()). We can also check if a particular language is supported by an android device through TextToSpeech.isLanguageAvailable(Locale), and that method will return back a support status code for the given Locale to notify us about its availability. For example, the calls:
mTextToSpeech.isLanguageAvailable(Locale.US);
mTextToSpeech.isLanguageAvailable(Locale.UK);
will return TextToSpeech.LANG_COUNTRY_AVAILABLE to indicate that both the language and the country are available.
While setting up the language for the engine, we have to make sure that the text’s language is a match for the engine so that we don’t make funny speech that is hard to understand.
Speak out loud!
Once we successfully initialize the TextToSpeech instance, configure the engine correctly, and define its behaviors we can move on to actually make the app take in a string input to synthesize the speech and speak it out loud. To do all these, we will use the TextToSpeech.speak(CharSequence text, int queueMode, HashMap<String, String> params) to speak the text we want. Let’s look at the following codes:
mTextToSpeech.speak("Text To Speech is cool!", TextToSpeech.QUEUE_FLUSH, null)
mTextToSpeech.speak("Text To Speech is not hard to understand.", TextToSpeech.QUEUE_ADD, null)
mTextToSpeech.speak("Text To Speech is easy.", TextToSpeech.QUEUE_ADD, null)
We see that some constants about Queue is mentioned in the code. It is because the TTS engine maintains a global queue for all the text entries to synthesize, which are also called “utterances”. Since each instance of TextToSpeech has its own queue, we need to flush the queue so that it can control which text entry can interrupt the current one and which one is queued. Hence, the first speak() flushes the queue and speaks its text entry, and the second and third speak() calls add their text entries into the queue in a first-in-first-out manner and speak them in order defined by the queue after the first speak() call is finished.
Note that the speak() is asynchronous, which means all the speak() calls are already finished before all the speeches from the queue have been synthesized and spoken out loud, regardless of the use of QUEUE_ADD or QUEUE_FLUSH. The optional params in the speak() method provides a way to perform other tasks after a speak() call is finished, and it can be set to null if we just don’t want to do anything after the speak() call is finished. We can also implement UtteranceProgressListener to define what to do before starting (i.e. OnStart()), what to do after finishing speaking (i.e. OnDone()), and what to do when there is an error (i.e. OnError()). The implementation of UtteranceProgressListener is not necessary for the speak() to work properly.
Audio file and playback
While the speak() method of TextToSpeech synthesizes and speaks the input text right away, we may want to store the synthesized speech as an audio files because we may choose to speak the same text repeatedly in our app. If we choose to use speak() to speak the same text all the time, the overhead burden for CPU to process the speech synthesis will increase unnecessarily and a lot of resources (e.g. memory, computation time, etc.) are wasted in the repeated speak() calls for the same text. To avoid this issue, we can use the TextToSpeech.synthesizeToFile(String text, HashMap<String, String> params, String filename) to synthesize the speech for the given text and store it into an .wav audio file. The example codes are the following:
String speechText = "Text To Speech synthesize to file."
String audioFilePathName = Environment.getExternalStoragePublicDirectory(Environment.DIRECTORY_DOCUMENTS).getPath() + "audio.wav"
mTextToSpeech.synthesizeToFile(speechText, null, audioFilePathName)
As we can see in the above codes, we use synthesizeToFile() to synthesize the speechText and store it as audio.wav file under the directory of Documents. Note that we have to edit the AndroidManifest.xml to give the app permissions for writing the audio file into the file storage of the android phone. We just need to add the following into the AndroidManifest.xml:
<uses-permission android:name="android.permission.READ_EXTERNAL_STORAGE" />
<uses-permission android:name="android.permission.WRITE_EXTERNAL_STORAGE" />
Alternatively, we can use synthesizeToFile(CharSequence text, Bundle params, File file, String utteranceId) which does the same job as the previous method. The only difference is the parameters of these two methods.
If we know there is an existed audio file that corresponds to a given text in the device, we can use TextToSpeech.addSpeech(CharSequence text, File file) such that the corresponding audio file can be played when the speak() method is called with that particular text:
File audioFile = new File(audioFilePathName)
mTextToSpeech.addSpeech(speechText, audioFilePathName)
mTextToSpeech.speak(speechText, TextToSpeech.QUEUE_ADD, null)
The addSpeech() method associates the given text string with the audio file. If that audio file doesn’t exist, the speak() will just synthesize the speech for the text and speak it.
At the end of using TextToSpeech
When we are done using TextToSpeech, we should call TextToSpeech.shutdown() inside the activity’s OnDestroy() to release all the resources used by its instance so that the TextToSpeech engine can be cleanly stopped and the previous resources held by it can be used by other apps.
Example App
To demonstrate the usage of the Android TTS feature, I have implemented a simple TTS-enabled example app that can allow user to enter the text and click the button to make the app speak out the text in different language. The main page of the app is shown below:
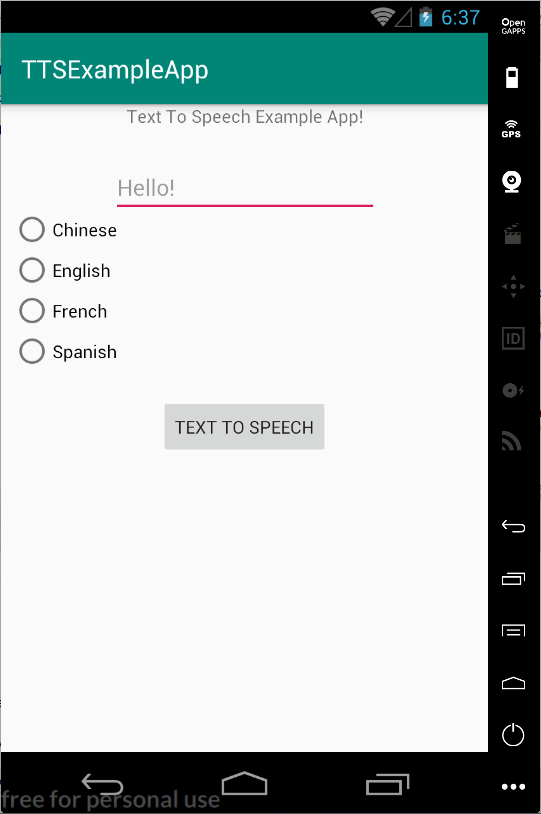
As we can see, this example app allows user to choose among Chinese, English, French, and Spanish through checking the corresponding radio buttons. Choosing different language will make the app speak the same text differently because the TTS engine is set to that chosen language via TextToSpeech.setLanguage(Locale) each time we select different radio button for the language.
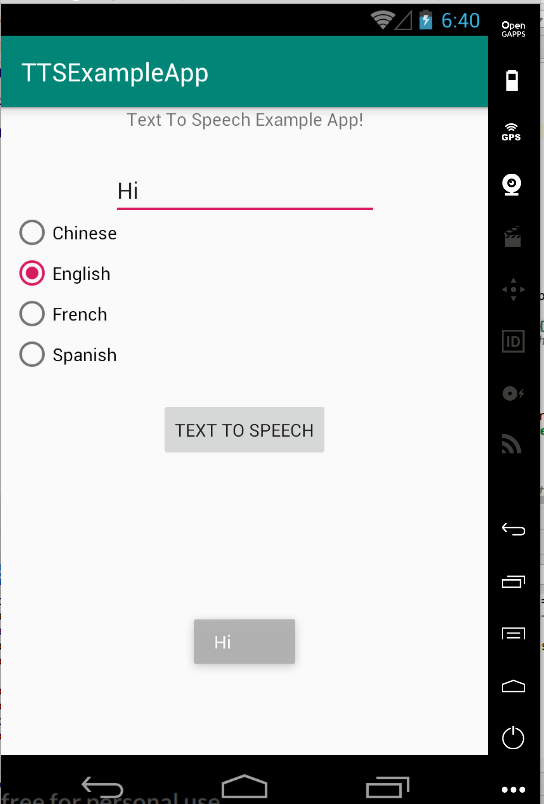
(Speak “Hi” in robotic-sound English)
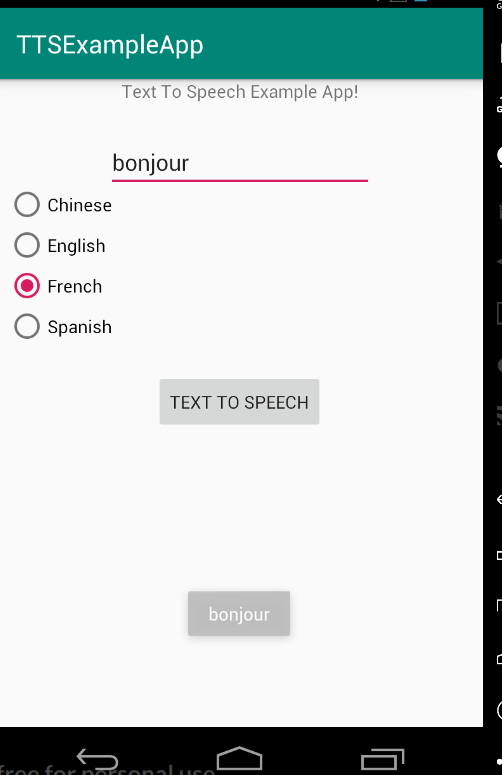
(Speak “Bonjour” in robotic-sound French)
The codes and the xml template that accomplish the switching of the languages for the app are shown below:
RadioGroup radioGroup = findViewById(R.id.radioGroup);
radioGroup.clearCheck();
radioGroup.setOnCheckedChangeListener(new RadioGroup.OnCheckedChangeListener() {
    @Override
    public void onCheckedChanged(RadioGroup group, int checkedId) {
        RadioButton languageRadioButton = group.findViewById(checkedId);
        if (languageRadioButton != null) {
            switch (languageRadioButton.getText().toString()) {
                case "English":
                    mTextToSpeech.setLanguage(Locale.US);
                    break;
                case "French":
                    mTextToSpeech.setLanguage(Locale.FRANCE);
                    break;
                case "Chinese":
                    mTextToSpeech.setLanguage(Locale.CHINESE);
                    break;
                case "Spanish":
                    mTextToSpeech.setLanguage(new Locale("es"));
                    break;
                default:
                    mTextToSpeech.setLanguage(Locale.US);
                    break;
            }
            isSameLanguage = false;
        }
    }
});
activity_main.xml
    <RadioGroup
        android:id="@+id/radioGroup"
        android:layout_width="wrap_content"
        android:layout_height="wrap_content"
        app:layout_constraintBottom_toBottomOf="parent"
        app:layout_constraintHorizontal_bias="0.029"
        app:layout_constraintLeft_toLeftOf="parent"
        app:layout_constraintRight_toRightOf="parent"
        app:layout_constraintTop_toTopOf="parent"
        app:layout_constraintVertical_bias="0.217">

        <RadioButton
            android:id="@+id/chinese_radiobutton"
            android:layout_width="wrap_content"
            android:layout_height="wrap_content"
            android:layout_weight="1"
            android:text="@string/chinese" />

        <RadioButton
            android:id="@+id/english_radiobutton"
            android:layout_width="wrap_content"
            android:layout_height="wrap_content"
            android:layout_weight="1"
            android:text="@string/english" />

        <RadioButton
            android:id="@+id/french_radiobutton"
            android:layout_width="wrap_content"
            android:layout_height="wrap_content"
            android:layout_weight="1"
            android:text="@string/french" />

        <RadioButton
            android:id="@+id/spanish_radiobutton"
            android:layout_width="wrap_content"
            android:layout_height="wrap_content"
            android:layout_weight="1"
            android:text="@string/spanish" />
    </RadioGroup>
What is not shown in the main page of the app is that each time the app speaks a text, it will first check if the audio file for that text exists or not in the phone. If not, the app will synthesize the speech and store it into an audio file for later usage so that we don’t waste CPU resource. If the audio file for that text exists in the phone, the app will associate the corresponding text with the audio file and play it. The codes that do this job is shown below:
        EditText editText;
        ...
        audioFolderPath = Environment.getExternalStoragePublicDirectory(Environment.DIRECTORY_MUSIC).getPath();
        ...
        editText = findViewById(R.id.editText);
        Button speechButton = findViewById(R.id.button);
        speechButton.setOnClickListener(new View.OnClickListener() {
            @Override
            public void onClick(View v) {
                String textForSpeech = editText.getText().toString();
                String audioFileName = textForSpeech+".mp3";
                String audioFileCompletePath = audioFolderPath + "/" + audioFileName.replaceAll("[^a-zA-Z0-9\\.\\-]", "");
                File audioFile = new File(audioFileCompletePath);
                if (audioFile.exists() && isSameLanguage) {
                    mTextToSpeech.addSpeech(textForSpeech, audioFileCompletePath);
                } else {
                    if (Build.VERSION.SDK_INT >= 21) {
                        mTextToSpeech.synthesizeToFile(textForSpeech, null, audioFile, null);
                    } else {
                        mTextToSpeech.synthesizeToFile(textForSpeech, null, audioFileCompletePath);
                    }
                    isSameLanguage = true;
                }
                Toast.makeText(getApplicationContext(), textForSpeech, Toast.LENGTH_SHORT).show();
                mTextToSpeech.speak(textForSpeech, TextToSpeech.QUEUE_ADD, null);
            }
        });
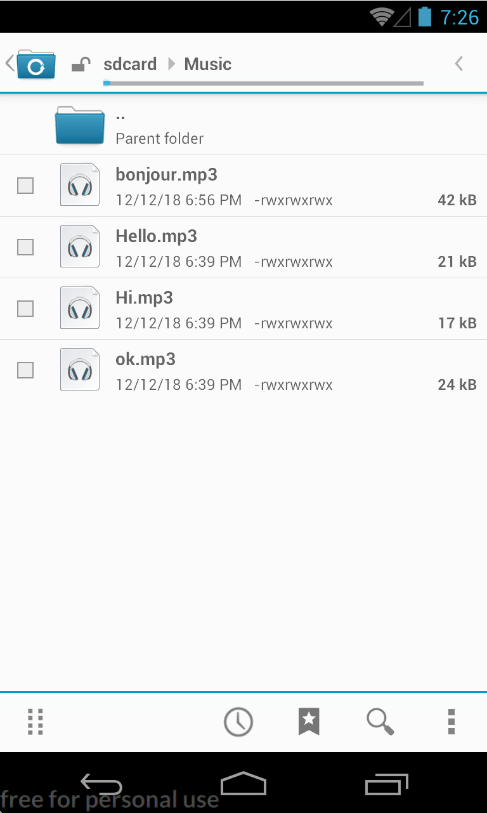
Notice that we have to check the build version of the device because we are using different TextToSpeech.synthesizeToFile() method for different build version due to deprecation. With these code, the app will get the text from EditText view and check if there is associated audio file. If there is, we associate the given text with the audio file via mTextToSpeech.addSpeech(textForSpeech, audioFileCompletePath). If not, the app synthesizes the speech and stores it as .mp3 file under the Music folders. At the end the app pushes the speak request to the queue and speaks it out loud. The result of running this part of codes is shown below:
If you want to see the full implementation of this example app, you can check out this Example App in my git repository.
Conclusion
Android Text To Speech is a powerful feature that can allow android apps to talk by generating speech from given texts. It can help people who have difficulty in reading the contents of the app a lot. The main takeaway from this discussion about Androdi TTS feature is that it is not difficult to be incorporated into any existing apps. To incorporate the TTS feature into an android app, we just need to initialize an TextToSpeech instance for a speech engine, define the behaviors of the TTS engine (e.g. through TextToSpeech.setLanguage(), setPitch(), setSpeedRate(), etc.), make the TTS instance either speak the text out loud through speak() or store the speech as an audio file through synthesizeToFile(), and finally shut down the TTS engine if it is not used anymore. But remeber that the language you choose to set the TTS engine should match with the texts that you want your app to speak. Moreover, the Text To Speech feature supports a large number of languages across the world and even includes variations of the same language in different regions. It increases an app’s accessibility to a larger pool of users across the world. If you want to know more about Android Text To Speech, you should definitely check out this developer documentation.